The 5 Step Process to Risk Assessment
Risk assessment is the foundation of health and safety in the workplace.
But, how do you conduct a risk assessment? And, what are the best practices?
Through this painless process, set out in this blog, you can control the risks in your workplace.
In this post, I will break down the 5 key steps of a risk assessment, so, you can ensure your business is working safely.
I will begin by answering a few common questions, before moving on to the process of conducting a risk assessment.
Are risk assessments a legal requirement?
The law requires employers to have suitable and sufficient risk assessments for their workplace.
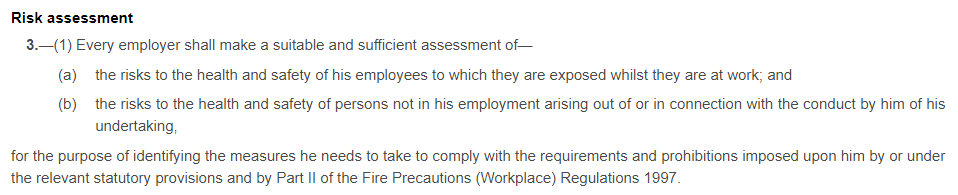
The Management of Health and Safety at Work Regulations 1999 states,
“3.—(1) Every employer shall make a suitable and sufficient assessment of—
(a)the risks to the health and safety of his employees to which they are exposed whilst they are at work; and
(b)the risks to the health and safety of persons not in his employment arising out of or in connection with the conduct by him of his undertaking”
As an employer, you don’t have to conduct the risk assessments yourself, but you must ensure that a competent person prepares them, and they meet the ‘suitable and sufficient’ criteria.
Note: If you employ fewer than 5 staff members, you don’t have to record any findings. However, you’ll still need to conduct a risk assessment.
So why has it become a legal responsibility? What purpose do they serve?
Let’s take a look…
What is the purpose of a Risk Assessment?
A safer workplace starts with its risk assessments.
Why?
Because when you identify your hazards and risks, you can manage them.
They help you to:
- Discover the hazards in your workplace
- Determine whether you have suitable and sufficient control measures
- Ensure your staff have the best possible chance to avoid injury and illness
So, let’s move on the all-important 5 steps.
Risk Assessment: The 5 Steps
Risk assessments are commonly split into 5 stages.
- Identifying workplace hazards
- Determining who may be harmed and assessing the risk
- Evaluating and controlling the risk
- Recording your findings
- Reviewing your findings
I will talk about these in more detail below, but, first, a couple of definitions.
Definition of a Hazard – Anything that can cause harm.
Definition of a Risk – The chance someone can be exposed to a dangerous situation.
To put this into context, a risk assessment identifies hazards and evaluates the likelihood these will cause harm and the potential consequences of this harm (i.e. the risk).
With that in mind, we move on to step 1 of a risk assessment.
Step 1. Identifying Workplace Hazards.
Without knowing the hazards in your workplace, you cannot evaluate your risks.
A good place to start is by walking around your workplace and asking yourself what could cause harm.
Think about short-term hazards as well as longer-term hazards.
Then, talk to your employees and get their thoughts. Discuss with them the hazards they face regularly.
Top Tip: Lone workers and those who work off-site need consideration too.
Additionally, you should:
- Consult your accident books for near-misses and incidents. Are there events that keep recurring?
- Check manufacturer’s instructions for anything they have outlined.
- Consider your workplace design. Is the layout of your workplace presenting any hazards?
- Look at all non-routine activities and unusual conditions faced in your environment.
- Think about visitors and contractors. What hazards might they face?
Write your observations down before moving on to create a comprehensive list of workplace hazards.
Remember, you do not have to plan for unforeseeable risk. Some hazards you can’t predict because they may only develop after certain incidents. As a result, you can’t plan for them.
So long as you have created ‘suitable and sufficient’ risk assessments, you won’t be liable.
Next, Step 2.
Step 2. Determining who may be harmed and assessing the risk
In this next step, you need to:
- Consider who a hazard will harm
- Decide the consequences of any harm
- Weigh up the likelihood harm will occur
Ask yourself: Who could be harmed in the event of an accident?
Observations can easily be combined with the first step when you are busy putting together your list of hazards. Give special consideration to those who are at higher risk (i.e. pregnant women, young employees, those with disabilities, etc)
Note down your findings. These observations will help you when assessing the likelihood and consequences of harm occurring.
Next, start using a risk matrix to assess the risk of injury and illness
As discussed, Risk= Likelihood of harm * Consequence of harm.
| Likelihood | Consequence |
| 1 – Very Unlikely (1 in 1,000,000 chance) | 1 – Insignificant (no injury) |
| 2 – Unlikely (1 in 100,000 chance) | 2 – Minor (injuries requiring first aid) |
| 3 – Fairly Likely (1 in 10,000 chance) | 3 – Moderate (up to 3 days of absence) |
| 4 – Likely (1 in 1000 chance) | 4 – Major (over days of absence) |
| 5 – Extremely Likely (1 in 100 chance) | 5 – Fatal (death) |
So, a point scale becomes useful when analysing your risk. Take a look at our example below.
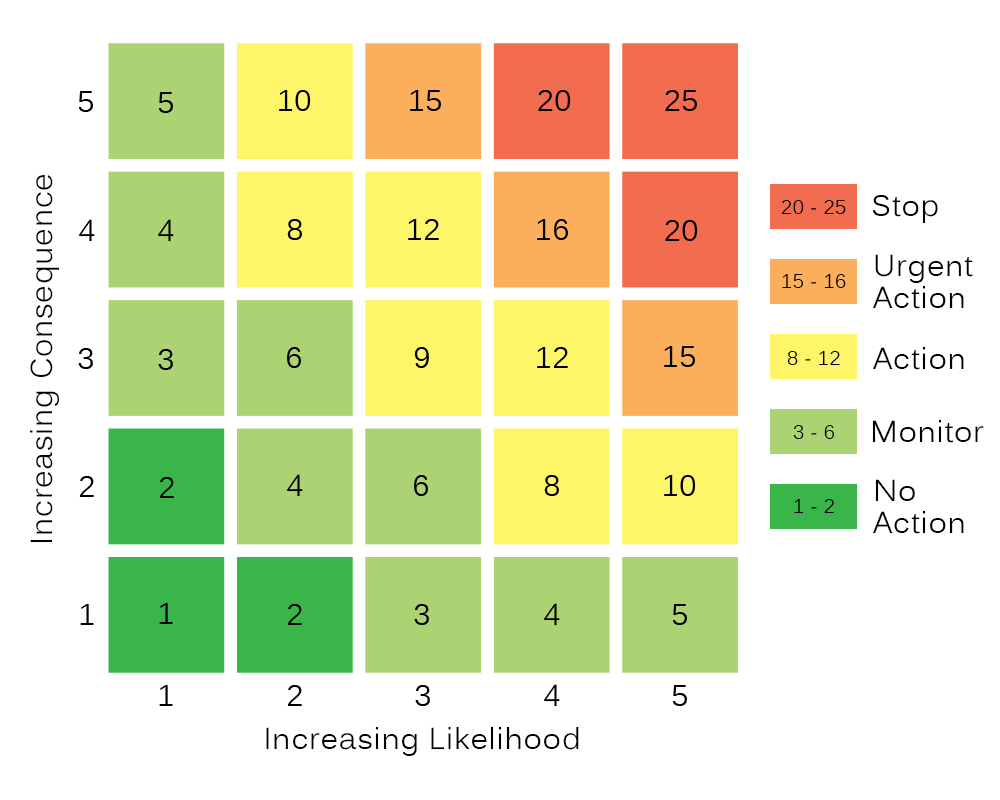
By multiplying the likelihood score and the consequence score, you can quantify the level of risk a hazard poses.
For example, if you have spotted a hazard which is:
Unlikely to cause harm (2), but,
could cause Major injury (4),
the overall risk score equals,
Risk= 2 x 4 = 8
By comparing this to a risk matrix you can see that this risk needs: Action
Step 3. Evaluating and Controlling Risk
After the assessment stage, you need to evaluate each hazard and put control measures in place to manage them.
These measures can either:
- Reduce the likelihood of harm occurring
- Reduce the consequence of an event occurring, or,
- Both
Here’s where a hazard’s risk score is useful.
Use it when deciding which control measures would be adequate and appropriate.
Which leads on to another important concept – The Risk Control Hierarchy.
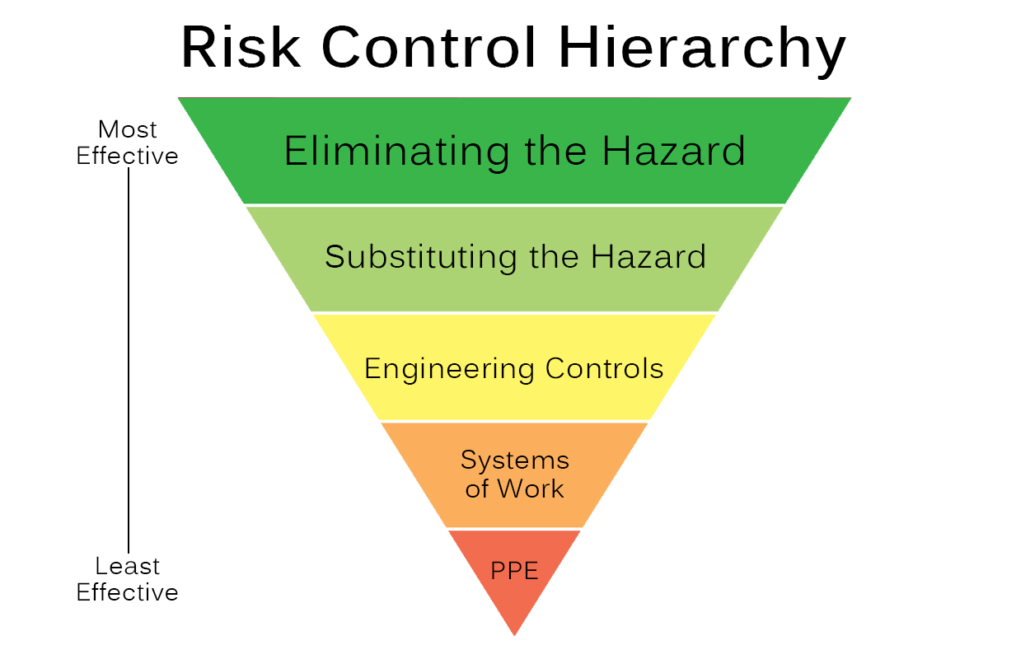
Risk Control Hierarchy
Control measures that rely on people following them to the letter are the most fallible.
Therefore, eliminating a hazard is by far the safest thing to do.
However, at times this isn’t appropriate.
So, you’ve got to choose other methods of controlling the risk. This decision should follow the Risk Control Hierarchy.
- Eliminate the hazard – Cut out the risk at its source.
- Substituting the hazard – Replace a hazard with a less hazardous one i.e. using working platforms instead of step ladders.
- Engineering Controls – Reduce the likelihood of someone coming across that hazard i.e. placing guards on machinery.
- Putting safe systems of work in place – Ensuring safety procedures are in place i.e. supervision of new employees, safety signs, training, reducing the time spent around a hazard, etc.
- Personal Protective Equipment – Providing employees with PPE that reduces the risk of harm occurring i.e. hi-viz jackets, ear defenders, goggles, respirators, etc.
Weigh up the risk rating against the cost, time and effort of a control measure.
For example, if a risk scores a 2 or 3 on the matrix, it’s probably not appropriate to spend large sums of money to reduce this risk.
A more cost-effective solution, which doesn’t reduce the risk to the same extent, could be the better option.
Decide on the additional control measures you need to put in place for each hazard before moving on.
Then, reanalyse the risk.
Reassessing the Risk
This involves assessing the updated (or, residual) risk to ensure your control measure works.
For example, if a hazard previously had a likelihood score of 3 and a consequence score of 4, then the total score would have been 12.
But, now, your control measure reduces the likelihood score down to 1.
Therefore, reducing the hazard’s total risk rating to 4. And, switching it from action to monitor.
Complete this for each hazard and move on to the penultimate step.
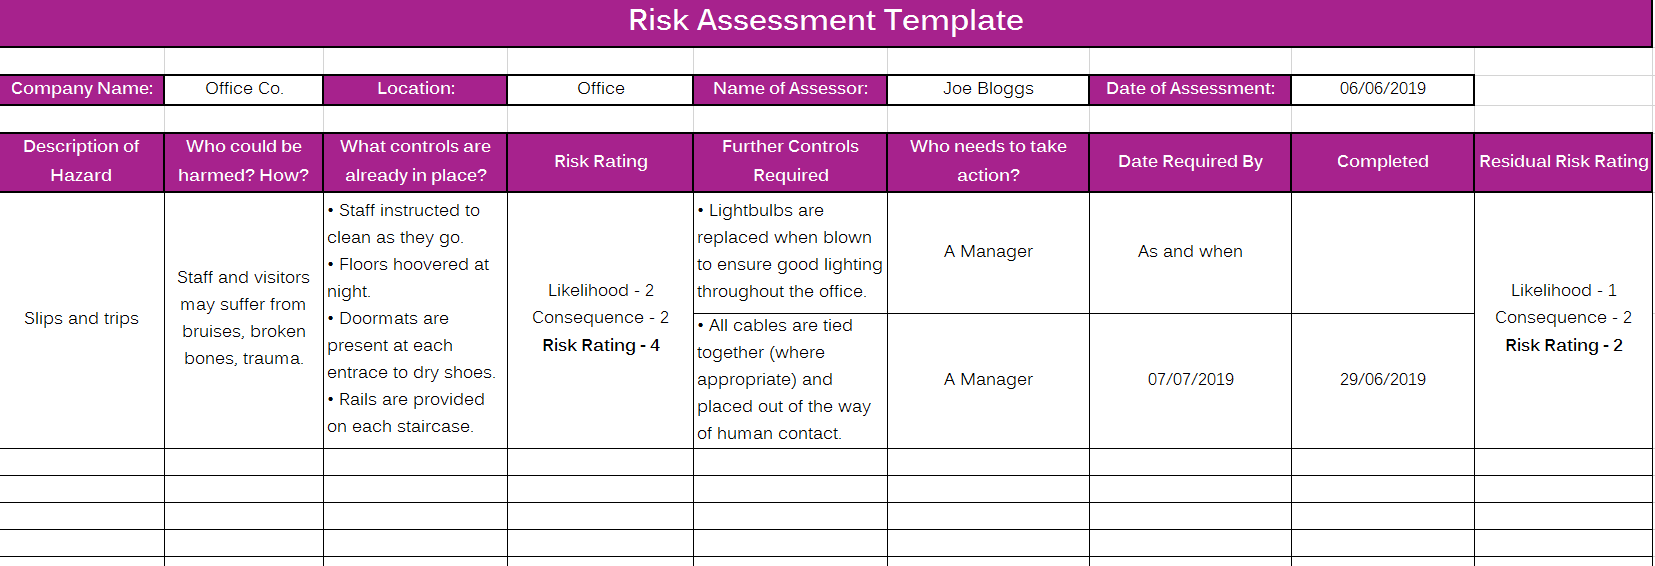
Step 4. Record your findings
An all-important step!
Time to get all that previous analysis down on paper – if you haven’t already.
When filling out your risk assessment(s), be sure to include:
- The person conducting the risk assessment
- Date of assessment
- Details of location
- People working in that environment
- Equipment used in that environment
- Activities conducted in that environment
- Hazards
- Existing control measures
- Proposed control measures
- Residual risk
- Date of review
AND then, share these findings with your employees!
By doing so, your workforce can understand where your workplace risks lie and mitigate the chances of injury and illness occurring.
Download our template to start recording your findings. Or, take a look at some examples here.
Step 5. Review your risk assessments
Risk assessments are a continual process and need reviewing whenever there are changes to your workplace.
This could be the installation of new equipment or a new employee starting work.
Whilst reviewing your assessments, account for any new hazards and remove any redundant hazards from your records.
Additionally, if you identify any new issues or you experience a string of accidents & near misses, it may be time for an update.
Conclusion
As an employer, you are legally required to fill out ‘suitable and sufficient’ risk assessments for your workplace.
And, you must remember to regularly review your assessments.
They exist for a good reason – to ensure everyone has the best chance to go home healthy and happy from work.
In this post, we have seen how a 5-step process can help you create your own risk assessments with ease.
So, take the time to fill them out and you’ll protect your staff and save yourself from prosecution.
If you want to increase your health and safety knowledge, you can take one of our health and safety training courses.